Ever since the first version of MIDAS, we’ve used to the term “venues” to refer to the rooms or bookable spaces you can manage using our scheduling software.
Why did we choose the term “venue”?
There are a number of reasons why we originally settled on the term “venues” to describe bookable spaces.
Firstly, MIDAS was initially development for a large school in Manchester, England. The software which it had replaced at the school also used the term “venue”. So for consistency, the “venue” terminology was carried over into MIDAS.
Secondly, the school that MIDAS was originally designed for had not only rooms, but also sports facilities, a recording studio, a courtyard, and a theatre available for booking – so the term ‘room’ didn’t quite fit when it came to addressing things like football (soccer) pitches.
We also didn’t want to use the word “resources” to denote bookable spaces, as “Resources” in MIDAS are things like equipment and consumables that you can ‘add’ to bookings.
“Venues” don’t work for everyone!
From its first release nearly 20 years ago, MIDAS has since found booking applications across a whole host of industries and settings.
Today, MIDAS is used by bowling alleys, libraries, village halls, recording studios, cruise ships, vehicle rental companies and many more!
As such, the term “venue” we use to describe a bookable ‘thing’ isn’t necessarily always the most appropriate in all scenarios.
Changing the term “venue”
Now, self-hosted MIDAS customers have always been able to modify the included language packs to change the wording and terminology within their booking system. That way they can tailor the language used in their MIDAS system to their specific operations.
However, this can be quite a cumbersome process, and there’s been no way for cloud-hosted customers to make such changes (unless they have the optional Custom Branding addon)
But we’re improving this for MIDAS v4.39.
For new self-hosted or cloud-hosted installations of v4.39 (or later), the first time you login you’ll be prompted to select the term which best describes the primary ‘things’ you’ll be booking.
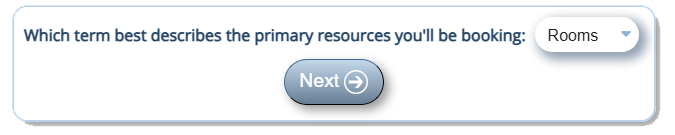
The 10 terms initially available to choose from are:
- Areas
- Desks
- Facilities
- Lanes
- Locations
- Rooms
- Spaces
- Studios
- Vehicles
- Venues
…so if you’re using MIDAS for managing bookings at a recording studio, you could select “Studios”. Alternatively, if you’re using MIDAS for desk booking in a library, you could select “Desks”
MIDAS will then replace all references to “venues” with your chosen terminology throughout the software.
Should you wish to change the term MIDAS uses in place of “venues”, you can update this setting at any time. You’ll find it via MIDAS Admin Options → Manage MIDAS → Appearance → Language.

A couple of things to note…
The ability to change the ‘venue’ terminology as described above is only available when MIDAS is displaying in an English language variant.
You’ll still see references to ‘venues’ across our website. For example, in our online documentation, there are references to the “Manage Venues” screen. However, if you’ve set your MIDAS system to use the term “Rooms” instead, your “Manage Venues” screen will be a “Manage Rooms” screen.
The local documentation which accompanies your MIDAS system – and which is accessed via the [Help] links – will automatically update reflect the specific terminology you’ve set.