MIDAS ships with a set of standard booking and client input fields. These input fields allow you to capture specific details about a client and their bookings.
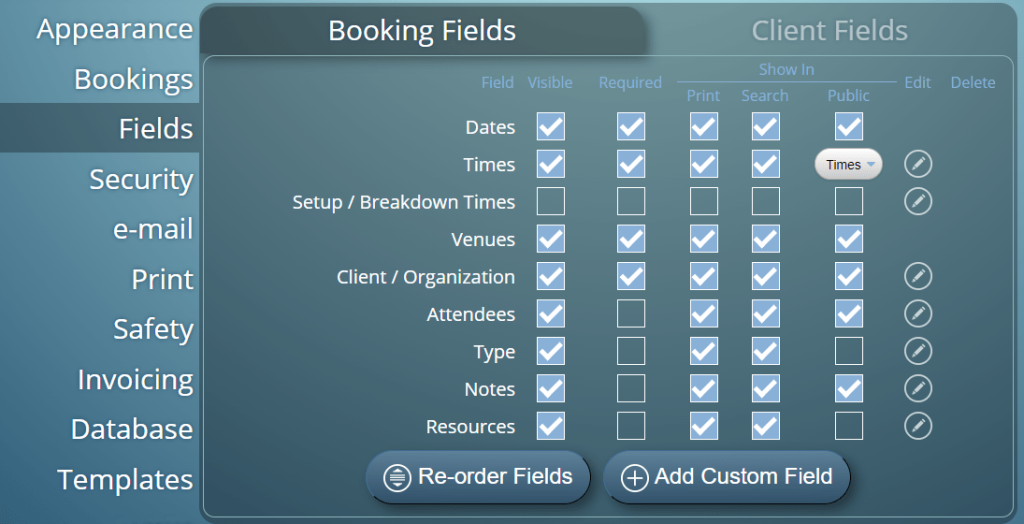
Now some of these fields will always be required. For bookings, a minimum of a date and a venue (room/bookable space) is required. All other booking fields can be set to be optional. Likewise, for clients, a minimum of the client’s name is required. All other client fields can be set to be optional.
Here’s a list of the standard fields which are included in MIDAS by default:
| Default Booking Fields | Default Client Fields |
|---|---|
| Date | Client |
| Times (Booking) | Organization |
| Times (Setup / Breakdown) | E-mail Address |
| Venue | Mailing Address |
| Client / Organization | Telephone Number |
| Attendees | Fax Number |
| Booking Type | Cell/Mobile Number |
| Booking Notes | Client Notes |
| Resources |
MIDAS also allows you to “turn off” fields that you don’t need. So if you don’t need to capture a client’s fax number, you can disable that field.
But that’s not all – in addition to the standard “default” fields, you can create additional custom booking or client fields in MIDAS.
Adding Custom Fields
A range of different types of custom fields can be created, including:
- Checkbox – A “tick box” field.
- File – Allows uploading/attaching of files and documents to bookings or client records (self-hosted systems only)
- List (Single Select) – A drop-down list of pre-defined items from which a single item may be selected.
- List (Multi Select) – A drop-down list of pre-defined items from which multiple items may be selected.
- Number – A field that will only accept numerical input.
- Range – A “slider” control allowing selection of a numeric value within a defined range.
- Text – A single-line text field.
- Text Area – A multi-line text field.
- URL – A navigable web link to an external resource.
As with standard fields, custom fields can also be set to be “required”. This means that an input is required in the custom field each time it’s shown.
New Validation Feature
For MIDAS v4.34, we’re extending the capabilities of marking custom number, text, text area, and URL fields “required”.
Let’s take the example of a custom single-line text field. Marking this as a required field would ensure that a user would enter something into the field. However, MIDAS wouldn’t check what they’d actually entered. Just entering a single character, or gibberish would be enough to allow you to proceed.
From v4.34 onwards, when setting a custom number, text, text area, and URL field as “required”, you can instruct MIDAS what values are considered “valid” for the field. A user would then need to enter a “valid” value in order to proceed.
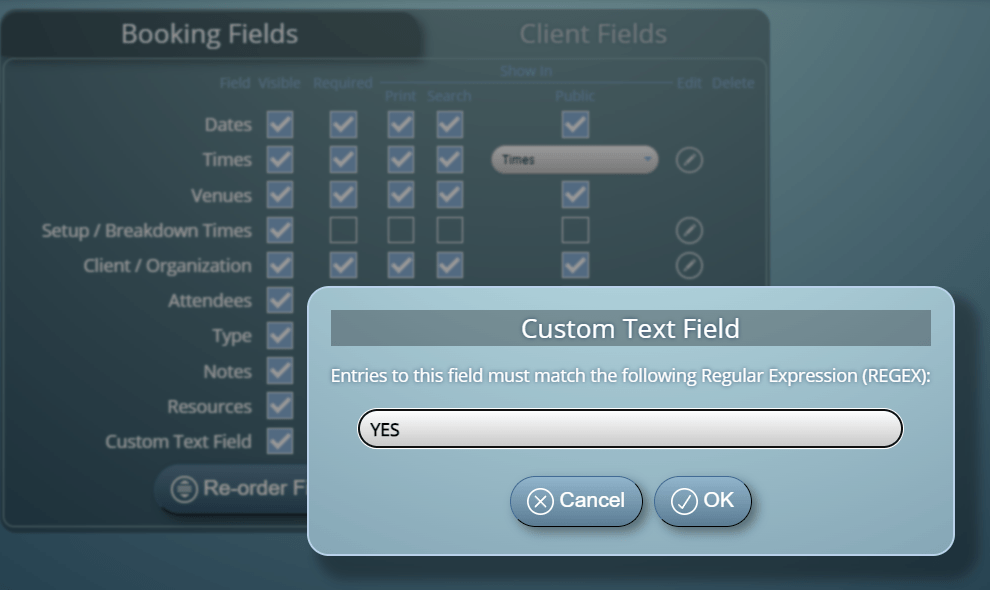
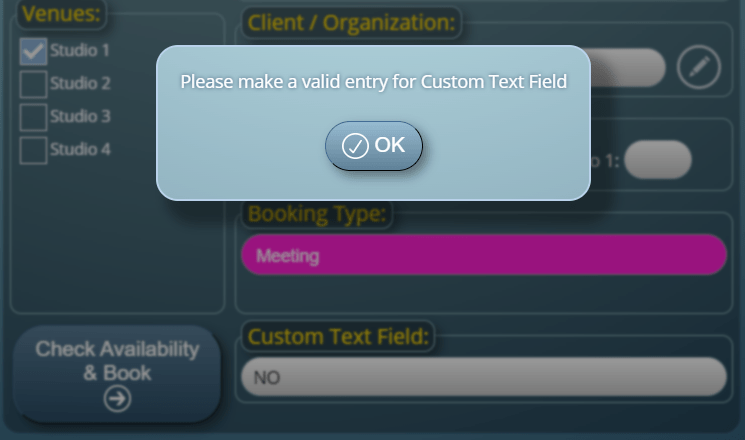
A Simple Example
As an example, you could make it so that a user has to enter the word “YES” into a custom text field in order to proceed. If the custom field doesn’t contain the word “YES”, the user will be prompted to correct their entry:
The Power Of REGEX
Regular Expressions (REGEX) can be used to create more complex validations for your custom fields too. We’ll cover REGEX in more depth in a future article. In the meantime, as a brief introduction, here are a few simple yet useful REGEX’s for validating entries into your custom fields:
| Description | REGEX |
|---|---|
| Value must start with the letters “BOOK” | ^BOOK |
| Value must end with the letters “ING” | ING$ |
| Value must contain “BOOKING” | BOOKING |
| Value must be exactly “BOOKING” | ^BOOKING$ |
| Value must contain a number (digit) | \d |
| Value must not contain a number (digit) | \D |
| Value must be exactly “BOOK”, followed by two single digit numbers | ^BOOK\d\d$ |
You’ll find further examples together with detailed explanations in our KB article: How to use Regular Expressions for custom input validation.
How To Use
Custom field validation can be setup via MIDAS Admin Options → Manage MIDAS → Fields.
On any custom number, text, text area, or URL fields, right-click (or long press on touch screens) on the field’s “Required” box.
You’ll then be able to set or modify the Regular Expression that should be used to validate entries to the field.