
How to install MIDAS on your server
Before purchasing a MIDAS booking system for download and installation on your own server (the self-hosted / on-premises edition of our software), please ensure that your web server meets the minimum System Requirements. We also provide a useful "Server Readiness Tool" to help determine and advise whether your infrastructure is ready for MIDAS.
How to install prerequisites needed for running a self-hosted edition of MIDAS from a Windows server
If you're unable to meet the requirements for running a self-hosted MIDAS system on your own server, did you know that we also offer a hassle-free "cloud" edition of MIDAS as well? Compare self-hosted vs cloud-hosted editions of MIDAS
Shortly after you purchase our room booking and resource scheduling software for download and use on your own web server, we'll send you a welcome email containing link to download the installer script, and a unique "Product Key".
Before you can use the installer, you must first set up a database (MySQL or MariaDB) for MIDAS to use. Once you've set up an empty database, our installer will have your booking system up and running on your infrastructure in no time...
Step 1: Upload the installer to your server
- Save the MIDAS installer to your computer (You will receive a link to this in a Welcome email shortly after purchase)
- Next, open your FTP software, and log in to your web server.
- Unless you wish to install to the root web directory (typically "wwwroot" or "public_html"), create a new subdirectory i.e. "midas" (ensuring that this location is writable to, and executable from).
- Upload the MIDAS installer into this directory.
Be aware that some system configurations will only allow ".pl" scripts (PERL/CGI) to be executed from within certain directories i.e. "cgi-bin". It is also important to note that the location to which you upload & install MIDAS also to needs to be granted "write" permission, as the software needs to write data to this directory.
Step 2: Check Permissions & Location of Perl
- Once you've uploaded the installer, ensure the permissions of this .pl file allow your server to "execute" it - CHMOD to "755" (Execute Permissions)
- Secondly, if the location of Perl on your server differs from
#!/usr/bin/perl, you may need to modify the very first line of the installer (using a standard text editor) to reflect the correct location of Perl on your system. No other part of the installer file should be altered in any other way.
Step 3: Run the Installer
- Open your web browser, and navigate to https://<yoursite>.com/midas/install.pl (or the equivalent URL to where you have uploaded the installer on your server)
- You should then see a screen similar to the following, showing the License Agreement:
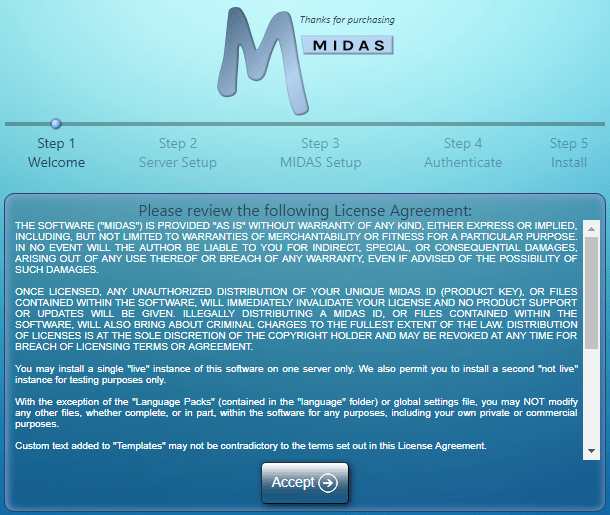
- If you are happy to accept the License Agreement, click the "Agree" button to continue...
- Some of the settings on the next screen may already be filled in with information the installer has automatically detected from your system configuration. Check all this information is correct, and fill in any blanks. Below is a description of all the settings:
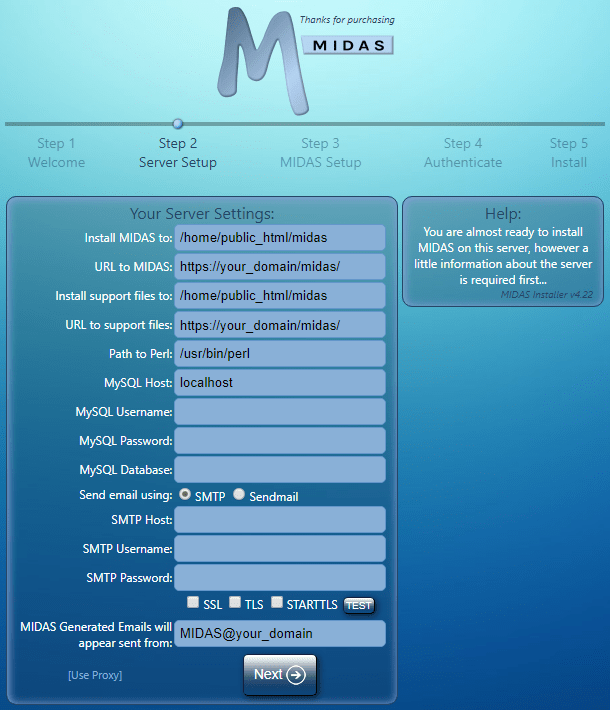
Install MIDAS to The Server Path to the location at which you wish to install the software - example: /public_ html/midas - This location must be able to execute CGI/PERL from, and must have the "write" permission set. URL to MIDAS The web address (URL) your users will enter to access MIDAS - this should be the corresponding URL to the Server Path your entered above. Install support files to In most cases, this can be the same as the entry for "Install MIDAS to". You should only need to use a different setting here if the location specified in "Install MIDAS to" only permits executable files, and does not permit static, non-executable files (such as images, etc). URL to support files The web address (URL) that corresponds to the "Install support files to" server path above. Path to Perl The location of "Perl" on your server - In many cases, this is typically /usr/bin/perl - Check with your server's administrator/host if you are unsure. Database Driver If multiple database drivers are found, this option will allow you to select the driver you wish to use. Database Host The address of your MySQL/MariaDB database server. This can be left as "localhost" if MySQL is available on the same server as you are installing MIDAS. If your MySQL server differs from the server upon which you are installing MIDAS, you'll need to specify the address/IP of your MySQL server here. Database Username The username required to connect to the database you've set up on your database server. Database Password The password required to connect to the database you've set up on your database server. Database The name of the MySQL/MariaDB database on your database server you wish to use for MIDAS. If you haven't already set up a blank database you will need to do so before proceeding - see How do I set up a new MySQL database?. Send email using Choose whether the software should send emails using either Sendmail (typically available as standard on Linux-based servers), or via an external SMTP server/relay (such as the one used by your own organization for sending outgoing email). SMTP Host / Username / Password If you've chosen to have your MIDAS booking system send emails via SMTP, enter your SMTP server address (i.e. smtp.yourhost.com) and credentials to authenticate the sending of email (if required by your SMTP host). If your SMTP server requires an SSL, TLS, or STARTTLS, select the appropriate option here. If unsure of the correct settings to use, please contact your mail server administrator for assistance. Path to Sendmail If you've chosen to have the system send emails using "SENDMAIL", enter the path to sendmail on your server - example: /usr/sbin/sendmail - Check with your server's administrator/host if you are unsure. MIDAS Generated Emails Will Appear Sent From When the software sends automated emails (such as password reset instructions), this is the email address that such notifications will appear to have been sent from. It is good practice to use the format MIDAS@yourdomain.com or no-reply@yourdomain.com here. - Click "Next" to continue. The installer will attempt to verify the information you've entered and will alert you to any potential problems it detects, otherwise the following screen will be shown:
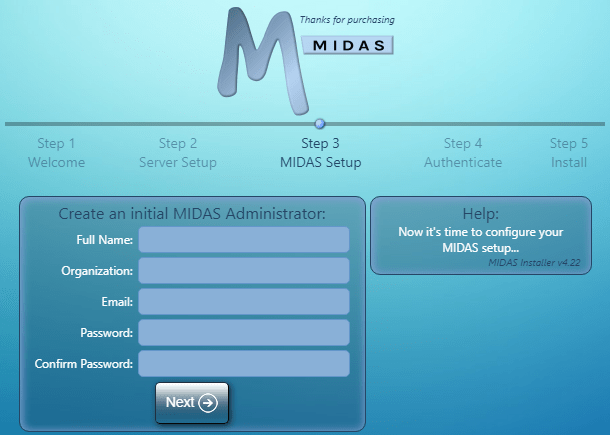
Full Name Enter your full name. Organization The company, business, or organization you work for. Note: This will also be the name for your initial database. If you are running multiple databases in your MIDAS system, this will make it easier for you and your users to distinguish between different databases. Password Enter a secure Password for yourself - NOTE: This is CASE SENSITIVE - You will need this to sign-in immediately after installation. Confirm Password Re-enter the password you entered into the field above. Email Your email address - You will also need this whenever you sign-in to your MIDAS booking system. - Click "Next" to continue.In this final step you will be prompted to enter your unique Product Key - You will have received this via email after you purchased the software, and cannot install the program without it.
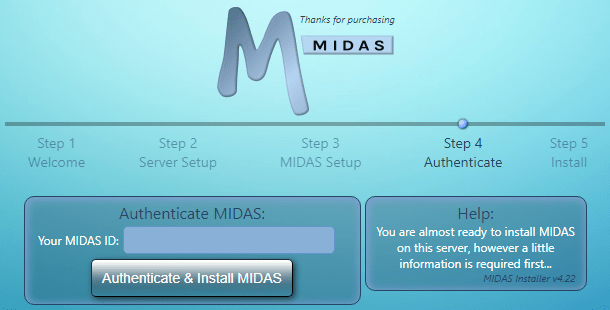 Your server will need to establish an Internet connection to our registration server in order to validate your Product Key. If your server connects to the Internet through a proxy, please click the [Use Proxy] link to enter the address of your proxy server
Once you've entered your Product Key click the "Authenticate & Install MIDAS" button.
There may be a short delay whilst your installation is authenticated.
- Once authenticated, the installer will then proceed to download, install and automatically configure MIDAS on your server. This process may take a couple of minutes. Do not reload your browser if there appears to be no activity for a period of time.
- Once installation & configuration is complete, the installer will automatically transfer you to your MIDAS sign-in screen, from which you can log in, and set up your room scheduling system (adding more users, venues, bookings, resources, etc)


For security, the installer will be automatically removed from your server upon successful installation. If, for any reason, you need to re-install the software at a later stage, you will need to re-upload the installer again
Trouble installing your MIDAS booking system?
We've compiled a list of common issues encountered during install of our software, together with resolutions, which you can find in our Installation Troubleshooting article.
← Return to the Knowledge Base