1 minute read time · Updated March 12, 2024 · First published June 8, 2018
We love giving customers flexibility over how they charge clients for use of their rooms and spaces.
MIDAS already allows specifying different “room rates” for different days of the week, and for different lengths and types of bookings. In addition, venues can be charged “per booking”, “per hour” or “per day”.
For more information on setting venue rates, please see our short video tutorial:
How to set venue rates
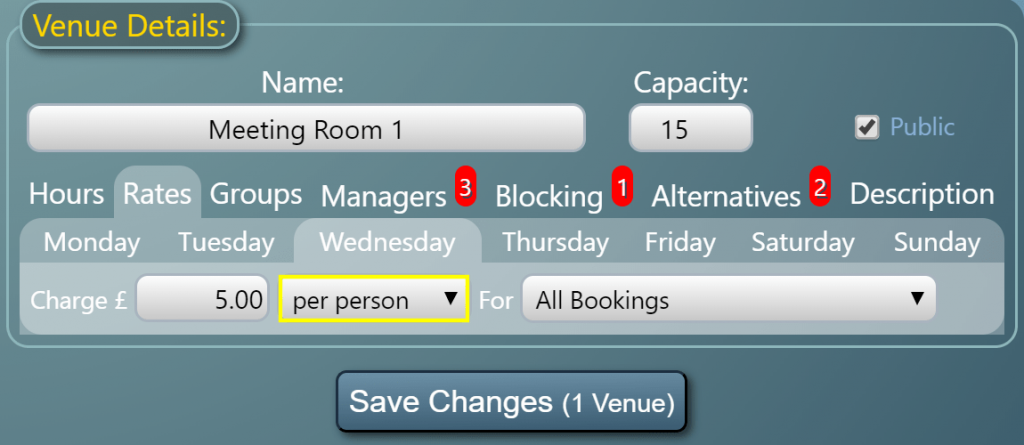
For our upcoming v4.19 release, we’re introducing a new “per person” venue rate:
Per Person Venue Rate
When a venue rate is set to “per person”, the charge for hire of the venue will be determined by the number of attendees for the given booking.
For example, suppose you set a “per person” venue rate of $5, and you then add a booking with 10 attendees. The total charge for hire of that venue would be 10 x $5 = $50.
You’ll still also be able to setup different rate types for different lengths of bookings too. For instance, this would allow you to charge a reduced rate for lengthier bookings.
Click here to continue reading about some of the other new & improved features coming in MIDAS v4.19!
2 minute read time · Updated March 12, 2024 · First published March 29, 2018
MIDAS v4.18 is almost ready for general release, and boasts a variety of user-requested features and improvements.
One of these improvements concerns the way that information is display on “blocks” within the booking grid. Each “block” within the booking grid represents a booking. Administrators can set up to two booking fields to display within each block. A further two booking fields can be set to display on the associated tooltip.
Here’s a typical example showing the Client and Organization field values on the booking block, and the booking times and booking notes in a corresponding tooltip:
Now, that’s all fairly obvious as to which fields are being displayed. But as MIDAS allows you to add your own custom booking fields, which can also be shown on booking blocks and their tooltips, consider the following example:
In the above example, the value of two custom booking fields has been set to shown on booking blocks. These two fields are drop-down lists. However, because the name of the field isn’t shown on the block, only it’s value, the above offers little insight into what’s being shown.
That’s why for v4.18, we’re giving administrators the option to choose whether individual field names are included on booking blocks/tooltips along with their corresponding values, or just the field values only (as in earlier versions of MIDAS).
Here’s the above example again but this time with the settings configured to include the name of the field too:
As you can see, this is a lot much user-friendly. So we’re sure this improvement will be welcomed by our customers.
Click here to continue reading about some of the other new & improved features coming in MIDAS v4.18!
2 minute read time · Updated August 8, 2024 · First published March 12, 2018
We think we’ve really “Excelled” with our forthcoming update to MIDAS… literally!
…because we’re adding the ability to export directly in the native Excel (2007+) .xlsx format.
Previously in MIDAS, if you wished to export bookings, clients, invoice summaries, or resources directly to Excel, you’d first need to export as a CSV (Comma Separated Values) file, and then import this file into Excel.
However, in MIDAS v4.18, you’ll now be able to export data directly into a native .xlsx Excel 2007+ format!
Export data to Excel (.xlsx)
Furthermore, following customer feedback, we’re also providing the ability to export Statistics & Reports data directly to Excel too. On Statistics report pages you’ll now find an “Export” icon:
Export statistics to Excel (.xlsx)
Self-Hosted Customers: Please note – in order to take advantage of the new Excel export options in MIDAS v4.18, you’ll need to ensure that the Perl module “Excel::Writer::XLSX” has been installed on your server. (This module is already installed on our cloud-hosted infrastructure). For assistance installing Perl modules on your server, please refer to our KB article: How to install Perl modules.
Click here to continue reading about some of the other new & improved features coming in MIDAS v4.18!
2 minute read time · Updated March 12, 2024 · First published March 12, 2018
The first big update of 2018 for our MIDAS web based room booking and resource scheduling system is nearly ready, and includes a number of user-requested features and improvements.
Now, MIDAS has included a “BCC outgoing email to” setting for quite some time now. This setting allows you to enter an e-mail address to which e-mail (excluding generated notifications) sent by your users through MIDAS will be BCC’d (Blind Carbon Copied) to.
It’s a useful setting, as it allows administrators to keep track of outgoing e-mails, or for archiving purposes.
However, the setting has caused confusion for some customers who instead expected this setting to send a copy of EVERY single outgoing email (including system-generated notifications) to the defined email address, rather than its intended use of only BCC’ing emails that are not generated notifications (for example, if a user emails a client through the in-built email function).
Therefore, to add greater flexibility for those customers who have requested it, we’ve expanded the email BCC capabilities of MIDAS for v4.18.
Choosing which emails to BCC
You’ll now be able to select which “types” of outgoing emails from your MIDAS system you’d like to be BCC’d to a pre-defined address:
Choose which types of email to BCC
The types of outgoing email you can choose to be BCC’d include:
Generic
Bookings:
Booking Cancellation
Booking Confirmation
Booking Reminder
Booking Requests:
Booking Request Approved
Booking Request Approved (with changes)
Booking Request Rejected
Booking Request Submitted
Invoices:
Invoice (Cancellation)
Invoice (Regular)
Invoice Overdue
Invoice Reminder
Receipt
We do however suggest that you think very carefully as to which types of emails you select to be BCC’d. For larger MIDAS systems this could result in a significantly higher volume of outgoing email traffic.
For this reason, the extended BCC email options for our “cloud-hosted” customers are limited to only be available if your MIDAS system is configured to send outgoing email via an external SMTP server/relay. If your cloud-hosted MIDAS system is configured to send email via the internal “Sendmail” option, extended BCC email options will be unavailable to you. This restriction does not apply to self-hosted MIDAS systems.
Click here to continue reading about some of the other new & improved features coming in MIDAS v4.18!