Posts Tagged: security

New “Stay Signed In” feature

Have you ever hit the reload/refresh button in your browser whilst logged into MIDAS? Were you surprised to be bounced back to a login screen when you did? Well no more!

We’ve redesigned and improved the sign-in experience for MIDAS v4.39.

In previous versions, two options were offered on the sign-in screen..

Remember Me

Remember Me

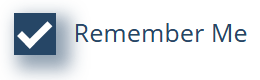
Previously, the login screen included a “Remember Me” tick box. If this was selected when a user logged in, MIDAS would store their credentials in a cookie. The next time they accessed the login screen in the same browser, MIDAS would read this cookie and automatically populate the various fields on the login screen.

Auto-Login

Auto Login

An optional “Auto-Login” box was also present on the login screen whenever the “Remember Me” box was selected.

If “Auto-Login” was also selected, then the next time the user accessed the login screen, MIDAS would not only read the ‘remember me’ cookie and automatically populate the fields on the login screen, but also automatically click the “Login” button.

Drawbacks

There were a number of drawbacks to this approach. The primary drawback being that the “Remember Me” option stored a user’s credentials in a cookie. Whilst this data was encoded and obfuscated, it is no longer best practice to store such data in this manner.

The “Remember Me” option is also now somewhat outdated redundant. It was first introduced some 16 years ago – way back with MIDAS v2 in September 2009. Back then, password managers weren’t really a thing, and web browsers themselves didn’t provide a means to remember logins to websites.

Nowadays, all modern browsers off users the ability to remember credentials to websites and webapps. In addition, third party password managers are now also common place.

So it was time to give the “Remember Me” function a complete overhall.

In doing so, we also wanted to address a frustration which a number of our customers have reported over the years. If, when using MIDAS, they accidentally hit their browser’s reload/refresh button, MIDAS jumps them back to a login screen. (That is, unless they had selected both the “Remember Me” and the “Auto-Login” options when they initially logged in).

To combat this frustration, and to simplify the number of options on the MIDAS login screen, starting with v4.39 users will see a single “Stay signed in” option on their sign in screen.

The previous “Remember Me” and “Auto-login” options have been removed.

Staying signed in

Selecting this new “Stay signed in” option when signing in will keep the user signed-in to MIDAS on that browser until they sign out (or until their session times out, based upon the security settings setup by an administrator in your booking system.

Here’s how the new sign-in screen looks:

MIDAS sign-in screen with the new 'Stay signed in' option
MIDAS sign-in screen with the new ‘Stay signed in’ option

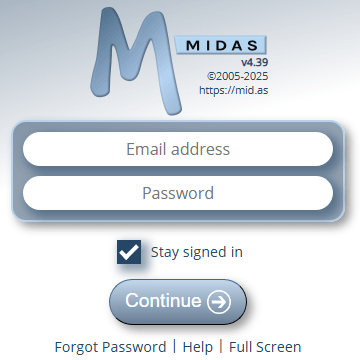
Like the previous “Remember Me” option, the new “Stay signed in” option also stores data in a cookie. However, unlike the former, the new “Stay Signed In” option only stores a randomly generated and unique session ID. No credentials themselves are stored in a cookie.

Refreshing and Reloading

Regardless of whether the new “Stay signed in” option is selected on a user’s sign-in screen, once the user has signed in, hitting refresh or reload in their browser will no longer jump the user back to a login screen – they will remain signed in!

With the “Stay signed in” option selected (and assuming the user isn’t accessing via a private/incognito browser window), the user can completely close their browser, and the next time they open it and access your MIDAS URL, they will still be signed in.

Security Considerations

Naturally, if the browser/device you use is shared by multiple people, then you should not select the “Stay signed in” option when signing in to MIDAS.

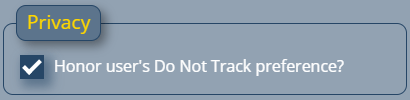
An administrative setting also exists to prevent the “Stay signed in” option from being shown to users.

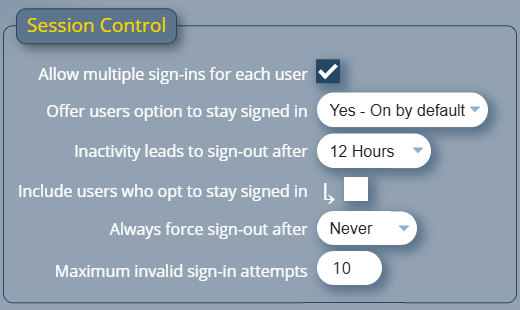
An administrator may also still wish to force user’s sessions to expire if there is an extended period of no activity. To accommodate this, new settings have been added to the Session Control section of the security screen. This screen may be accessed via MIDAS Admin Options → Manage MIDAS → Security.

New Session Control security options in MIDAS v4.39

Authenticator App Support

Authenticator App

Two-Factor Authentication (sometimes referred to as 2FA) is a more secure method of logging into websites or online services.

Traditionally, when you “log in” to a website or online service, you enter your username (typically your email address) and password. Then you click a button, and if the details you enter are valid, you’re logged in.

Unfortunately, many people reuse the same credentials (username / password combination) again and again for multiple websites and online services. The danger of this is that if one of those services gets “hacked” or suffers a data breach where user credentials are exposed, an attacker could potentially then access all other websites and online services that that person uses.

Two-factor authentication combats this. It does so by employing a secondary means of authentication in addition to the traditional username / password combination in order to authenticate a user’s access.

This means that even if a user’s password has been compromised, an attacker couldn’t then this to gain access to someone’s account.

Two Factor Authentication in MIDAS

Since 2015, all MIDAS room booking systems have included optional two-factor authentication. If enabled, this adds an additional layer of account security to our software.

With Two-Factor Authentication enabled, each time a user logins in, a code is sent to their email inbox. The user must then enter this code into MIDAS in order to complete their log in.

But starting with MIDAS v4.38, we’re improving 2FA options and support in our software!

MIDAS v4.38 (and later) now support authenticator apps – including Google Authenticator and Microsoft Authenticator – as an alternative 2FA login option to email.

Per User Two Factor Authentication Settings

Previously, the 2FA option in MIDAS was a ‘global’ setting. This meant that it could be enabled or disabled for all user accounts at once. It was not possible to have ‘per account’ 2FA settings.

We’ve made this more flexible for MIDAS v4.38!

Now, administrators can set whether 2FA is enabled for each individual user account. The 2FA option for each account can also be set.

Available 2FA options are now:

  • Authenticator App
  • Email

Enabling 2FA Authenticator App Globally in MIDAS

To globally turn on 2FA for all users, administrators can go to MIDAS Admin Options > Manage MIDAS > Security. In the “Two Factor Authentication (2FA)” section, tick the “Enable Two-Factor Authentication For All Users?” box, and then select the “Authenticator App” option:

Global Two-Factor Authentication Options - now includes authenticator apps
Global Two-Factor Authentication Options – now includes authenticator apps

Click “Save Changes” and 2FA via Authenticator Apps will be enabled for all user accounts.

Enabling 2FA Authenticator App For Individual User Accounts

2FA options are also available on a per-user account basis. Administrators can enable, disable, or change the 2FA method on a user account by going to MIDAS Admin Options > Manage Users & Permissions.

Select the user account you wish to enable 2FA for, and choose “Authenticator App” from the “2FA Login” setting:

New per-user Two-Factor Authentication Options

Then click “Save Changes”.

How 2FA via an Authenticator App Works

When 2FA authentication via authenticator apps has been enabled on a user’s account, the next time they login, they’ll be presented with a QR Code to scan with their authenticator app:

Setting up your authenticator app upon first login

If they’re unable to scan the QR Code a ‘secret key’ is also provided which can be manually entered into authenticator apps.

The user’s authenticator app will then generate a 6 digit code which they can enter into MIDAS to complete their login.

The QR Code / Secret Key needs only to be scanned/entered into the user’s authenticator app once upon first use. For subsequent logins, the user will simply need to enter the 6 digit code generated by their authenticator app:

Entering a OTP generated by your authenticator app to complete login

Supported Authenticator Apps

Popular FREE authenticator apps supported by MIDAS include:

However, any OTP authenticator app which generates Timed One-Time Passwords (TOTP) derived from a shared secret value and the current time should be compatible. TOTP codes are typically six digits long and change every 30 seconds.

Resetting 2FA

If a user looses their authenticator app, an administrative user in a MIDAS system can change the user’s 2FA method, or reset their authenticator token. By resetting a user’s authenticator token, the next time the user logs in, they’ll be presented with a brand new QR Code/Secret Key to enter into their authenticator app.

Availability

2FA login authentication has been available since MIDAS v4.10 (2015). However, this implementation is limited to authentication codes sent to users via email. 2FA could also only be enabled globally (for all user accounts)

2FA login authentication via either email or authenticator apps is available in MIDAS v4.38 or later. These options can be enabled globally, or an a per user account basis.


Deprecating some outdated settings

In MIDAS v4.37, we’re deprecating some outdated privacy and security settings.

In this post, we’ll outline what’s changing and explain the reasons behind the decision to remove these options.

“SSL Access” setting has been removed

SSL Access setting in MIDAS

In the early days of the World Wide Web, you connected to websites over “http”.

“http” connections were not secure and could be intercepted. So along came “https”, which allowed visitors to connect to websites over encrypted Secure Socket Layer – or SSL – connections.

However, adoption of “https” was initially slow by the majority of the World Wide Web. Primarily, this was due to SSL certificates being very expensive. Large financial institutions were naturally quick to jump on https. However, the price of SSL certificates put securing websites with https out of reach of the average webmaster. Especially when the cost to renew them every 1-2 years was factored in.

Now, as you may know, we’ve been developing our web based MIDAS room booking software for nearly 20 years now! When we first began to offer a “cloud hosted” booking system to customers (way back in 2007), SSL/https use around the web was not wide spread, and was expensive to implement.

Initially in 2007, we offered our cloud-hosted customers the option of being able to access their hosted MIDAS system over secure https. This was available via an optional (paid) addon for their scheduling system.

By June 2011, we’d recognized the importance and benefit of secure SSL connections for all our customers to their MIDAS systems. We therefore introduced better support for secure SSL connections with MIDAS v3.13.

As part of this, we added a new “SSL Access” setting to v3.13. This allowed administrators to control whether insecure http and/or secure https connections would be permitted to their MIDAS system.

In August 2012, we then took the further decision to include an SSL Certificate to enable secure connections for all our existing and future cloud hosted customers. At the same time, we enforced https connections to all hosted MIDAS system.

Consequently, the “SSL Access” option first introduced in MIDAS v3.13 became redundant for our cloud-hosted customers. Since 2015 and MIDAS v4.09, this option has no longer been available in cloud-hosted editions of our booking system.

In the following years, gradually the cost of SSL certificates reduced. Then in 2016, along came a game-changing service called “Let’s Encrypt“. Let’s Encrypt offered FREE SSL certificates for all. This finally allowed every webmaster the ability to “secure” visitor connections to their websites at zero cost.

In May 2018 we migrated all our cloud-hosted customer’s SSL certificates from expensive GlobalSign certificates to ones issued for free by Let’s Encrypt instead.

Now, in 2024, SSL/https certificates are the norm – in fact, all modern web browsers now alert you if you attempt to visit an insecure website via http.

So whilst we removed the “SSL Access” settings in cloud-hosted MIDAS systems back in 2015, we’re now also removing these settings for self-hosted customers starting with MIDAS v4.37.

“Allowed IP Range” setting has been removed (self hosted editions only)

Allowed IP Range setting in MIDAS

The “Allowed IP Range” setting is one of the earliest security settings we provided in our room booking system. In fact, it was first introduced in v1.35 back in August 2007.

The setting allows an administrator to restrict access to their MIDAS system to an IP address or range.

This can be useful if a MIDAS system is hosted on a public-facing web server, which potentially could be accessed by anyone worldwide. The “Allowed IP Range” setting can be used to restrict access to users in your own country, organization, or to just you!

However, one of the limitations of this setting is that it only supports ipv4 address, and not ipv6 addresses.

Also, in the years since this setting was first introduced, other security and firewall products are available which provide greater control over access to websites, apps, and servers.

Therefore, starting with MIDAS v4.37, we have removed the “Allowed IP Range” setting in self-hosted editions.

If you’re a self-hosted customer and wish to restrict access to your MIDAS system by IP address you should consider other options to achieve this.

For instance, on Apache servers, you can easily allow/deny access by ip address/range in your httpd.conf or .htaccess files. For more information, please see Apache’s guidance on access control.

“Do Not Track (dnt)” has been superseded by “Global Privacy Control”

Honor user's Do Not Track preference setting in MIDAS
Honor user’s Do Not Track preference setting in MIDAS

“Do Not Track” – or ‘dnt’ for short – was an official HTTP header first proposed in 2009. It was intended to allow user to opt-out of tracking by websites.

By 2011, all major web browsers had implemented support for the proposed “Do Not Track” features.

In 2017, with the release of MIDAS v4.16, we included an “Honor user’s Do Not Track preference” setting.

If enabled (and if an end-user had also enabled the “Do Not Track” feature in their browser), MIDAS would not log the user’s IP address in the Recent Activity Log.

However, globally, recognition and support of the “Do Not Track” HTTP header by websites was poor. So much so that in January 2019, the “Do No Track” HTTP header was officially deprecated. A month later, Apple removed DNT support from their Safari browser.

Whilst some other browsers still continue to offer a “Do Not Track” setting, it has since been supersede by a new “Global Privacy Control” – or GPC – header.

At time of writing, Global Privacy Control is still classed as an “experimental” and “non standard” technology, and it’s behaviour may change in the future.

But for MIDAS v4.37, we’ll support both DNT and GPC features. The “Honor user’s Do Not Track preference” setting will be renamed to “Honor user’s privacy preferences” to reflect this.

It’s likely that in a future update we’ll fully drop support the deprecated “DNT” header. At time of writing though, as some browsers still support it, we’ll continue to support it too.


Improved Device Detection

Device Detection

Whenever your user account is logged into from a new or unfamiliar device, MIDAS can automatically alert you by email. This additional security feature helps keep your account secure by alerting you to suspicious logins. An unfamiliar login notification includes details of the browser, operating system, IP address, and – with our optional Geolocation addon – location, of the device that’s just logged into your account.

Until now, MIDAS has been unable to distinguish between more recent operating system versions. For example, between Windows 10 and Windows 11, or between MacOS Ventura and Sonoma.

This is because MIDAS has relied on the “User Agent” (UA) string that’s presented by the browser that’s logging in.

Here’s an example of a browser’s “User Agent” string presented to a web server:

Mozilla/5.0 (Windows NT 10.0; Win64; x64) AppleWebKit/537.36 (KHTML, like Gecko) Chrome/123.0.0.0 Safari/537.36

There’s a lot of information there, but essentially, from this string MIDAS can derive that it’s a Windows (64 bit) device, and the browser is Google Chrome 123.

Here’s another example:

Mozilla/5.0 (Macintosh; Intel Mac OS X 10.15; rv:124.0) Gecko/20100101 Firefox/124.0

From this, MIDAS can derive that it’s a macOS device, and the browser is Firefox 124.

But wait… can’t MIDAS also determine the exact version of the operating system from these UA strings?

Mac OS X 10.15…. Catalina? …Big Sur? …Monterey? …Ventura?

Doesn’t “Mac OS X 10.15” imply macOS Catalina? ..and doesn’t “Windows NT 10.0” imply Windows 10?

Well, that used to be the case, but not any more!

Modern browsers now “clamp” the versions of more recent macOS/Windows operating systems reported by the User Agent string. For macOS operating systems, the User Agent string will report a maximum of macOS X 10.15. For Windows operating systems, a maximum of Windows 10 will be reported. Browsers no longer natively report the specific version of the operating system they’re running on.

This means that a Chrome browser running on either Windows 10 or Windows 11 will report “Windows NT 10.0”. Similarly, macOS Catalina (10.15), Big Sur (11), Monterey (12), Ventura (13), and Sonoma (14), will all report “Mac OS X 10.15”.

So Windows 10 and 11 are the same then?

In an effort to improve user privacy, browsers have decided to no longer reveal the specific operating system version a user is using when visiting a website, in order to make it harder for websites to “fingerprint” users.

“Fingerprinting” is a technique that some websites employ to uniquely identify and potentially track visitors.

So because of these changes to the way browsers report User Agent strings, it’s been difficult for MIDAS to provide a unfamiliar login notification containing details of exact operating system version that’s been used to login to an account.

But advancements in technology mean that we’ve now been able to make improvements to device detection for MIDAS v4.36.

Utilizing New “Client Hint” technology

Client hints are a set of HTTP request headers that provide useful information about the client such as device type and network conditions. This then allow servers to optimize what is served for those conditions.

Unlike the traditional “User Agent String”, client hints provide a more efficient and privacy preserving way of getting the desired information.

A web server can proactively request the client hint headers they are interested in. The browser can then include the requested headers in subsequent requests.

If the web server upon which a MIDAS system is running proactively requests either the “sec-ch-ua-platform-version” or “ua-platform-version” client hint header, MIDAS can receive details of the user’s operating system version.

Unfamiliar login notifications (if enabled) can then provide much more accurate information as to the operating system of the new device which has logged into your account.

Improved Device Detection in MIDAS v4.36

Web Server Configuration

Because a web server has to proactively request these new client headers in order for browsers to respond to them, servers have to be configured accordingly.

All of our cloud-hosted nodes have been appropriately configured. Our client servers now proactively request the necessary Client Hint headers. This in turn means that all cloud hosted users can start to take advantage of these improvements to device detection and unfamiliar login notifications.

For self-hosted customers, a small configuration change to the web server when your MIDAS system is running from is required.

Details of the configuration change you’ll need to make can be found in our KB article, How to configure your server for Client Hints.