How to import a Google Calendar into MIDAS
Have you considered an alternative solution that's designed specifically for this task, rather than a generic Google Calendar?
Did you know it's really easy to migrate from using Google Calendars to using MIDAS?! - Here's how in 5 easy steps...
Step 1 - Get MIDAS
MIDAS is available in both cloud-hosted and self-hosted editions. Cloud-hosted systems are available on a monthly or annual subscription basis. Self-hosted systems are offered with a perpetual license.
Find out which edition is right for you with our handy comparison, then get MIDAS here.
Step 2 - Login to Google Calendars
Once your MIDAS system is up and running, simply log into your Google Calendars account.
Step 3 - View Calendar Settings
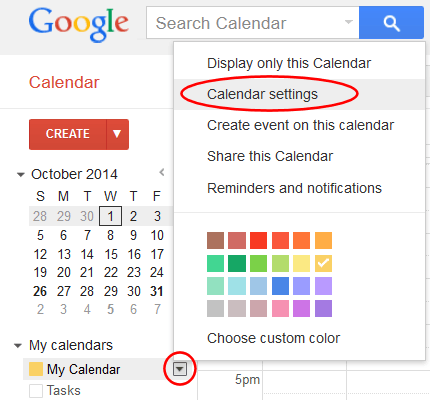
Once logged in to Google Calendars, locate the "My Calendars" section on the left side of the screen.
Click the little arrow to the right of the calendar you wish to import into MIDAS, and select "Calendar Settings":

Step 4 - Export iCal data
On the resulting Calendar Settings screen, scroll down to "Private Address".
Right click on the "ICAL" icon, and select "Save As":

You will then be prompted to save an .ics file to your computer. Remember the location where you save this file, as you'll be importing this file into MIDAS.
Step 5 - Import into MIDAS
Follow our instructions for importing Bookings into MIDAS in iCal format.
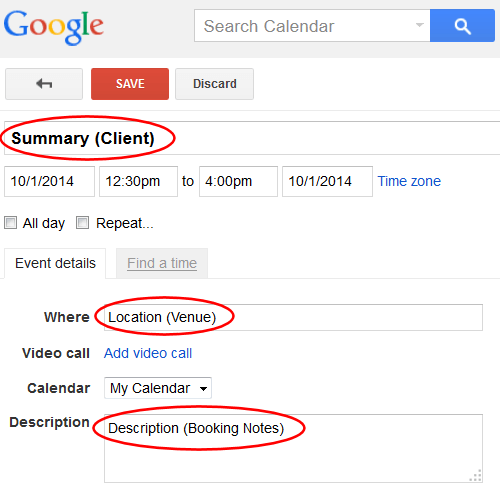
When you import iCal data into MIDAS you'll be able to "map" various iCal fields to fields in MIDAS.
For best results, we recommend the following:

- Using the "Event Name" (Summary) field in your Google Calendar for recording the name of the client that each booking is for
- Using the "Where" (Location) field in your Google Calendar for recording the venue that each booking takes place in
- Using the "Description" field in your Google Calendar for recording booking notes for each booking
← Return to the Knowledge Base