Table of Contents
← Hide Table of Contents
 Digital Signage Addon Settings
 Digital Signage Addon Settings
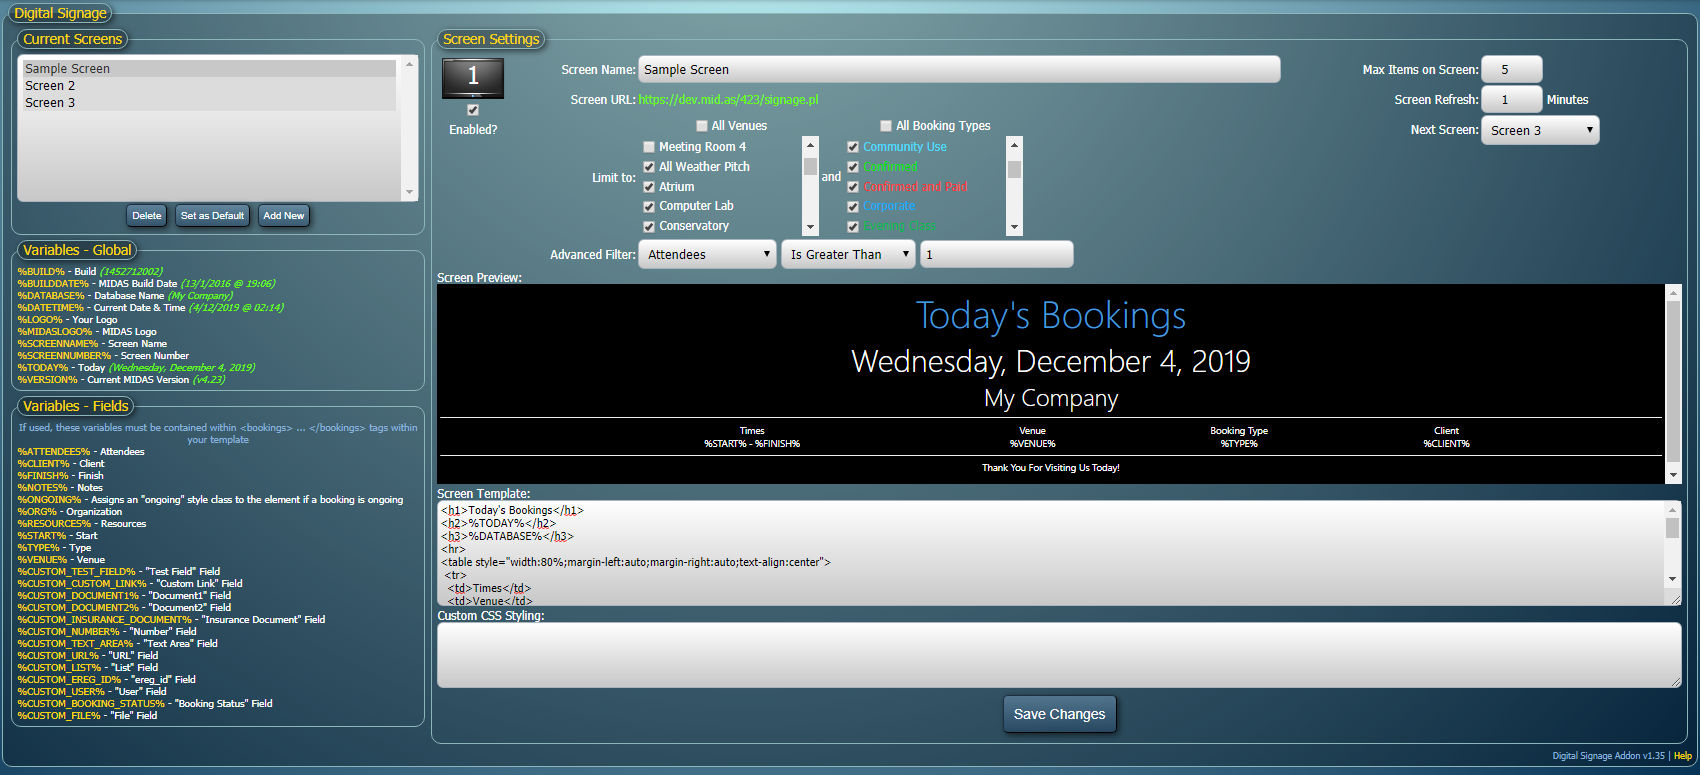
Above: The Signage administrative interface (MIDAS Admin Options → Addons → Installed Addons → Digital Signage)
The Digital Signage addon is configured within your MIDAS system, not on individual display devices. Settings and screens you configure here are available from any device that accesses your MIDAS.
From this screen you can define and design the content of each of your display screens. The following settings may be found in this area...
Current Screens
This is a list of all the signage screens you've already defined.To define a new screen, click "Add New" below the list.
To set an existing screen to be the "default" screen, highlight it in the "Current Screens" list and click "Set as Default". An asterisk will denote the current "default" screen.
Any display device not set to display a specific screen will display the "default" screen instead.
To remove a screen, select it and click the "Delete" button
Variables - Global
Lists a number of variables that you can use within your screen templates.These variables will be substituted for corresponding content on your actual display screens.
A full list of Global Variables and their meanings may be found here.
Variables - Fields
Similar to global variables, when field "field" variables are used within your screen templates, they are substituted with live data from corresponding booking fields on your actual display screens.A full list of Field Variables and their meanings may be found here.
Field variables must be placed within <bookings>...</bookings> tags
Enabled?
Allows you to "disable" individual screens. When a screen is disabled it will not show any booking information on your display devices, and instead display a "Screen Currently Disabled" message.Screen Number
The internal number representing the screen you are currently defining.This number cannot be changed, but is used for screen addressing. For example, to display Screen Number 4 on a display device, the URL for that device would be https://your_midas_url/signage.pl?screen=4
Screen Name
A name by which you can use to identify the screen you are defining.This name will appear in the "Current Screens" list and can be shown on your display device if desired through the inclusion of the %SCREENNAME% variable within your screen templates
Screen URL
The URL which you should point your display device(s) to in order to display the screen you're currently configuringMax Items on Screen
The maximum number of bookings that will be shown on the screen at any one time. Depending upon the font size used, and the resolution of your display devices, you may need to increase/decrease this number. The default is 5Note: The 'Max Items on Screen' setting has no effect when displaying room availability.
Screen Refresh
How frequently (in minutes) booking data on the screen should refresh.Next Screen
If left blank, when the Screen Refresh interval is reached, the current screen will simply refresh.If a "Next Screen" is specified, when the Screen Refresh interval is reached, the selected "Next Screen" will be displayed. This allows you to create "PowerPoint-like" "slide shows" of your screens! For example, on a single display device you could have Screen 1 showing for 2 minutes, followed by Screen 2 showing for 5 minutes, and then Screen 1 again, etc
Limit Screen To
These settings allow you to control which bookings should be included on the current screen. By default, "All Venues" and "All Booking Types" will be shown.This is useful if you have a general display device in a reception area showing an overview of every booking.
You can "untick" either of these options to limit the range of venues/booking types that are shown.
For example, if you have a dedicated display device situated directly outside "Meeting Room A", you may only want to display bookings for "Meeting Room A" on that particular screen. You would therefore untick "All Venues", and select just "Meeting Room A" from the venues list
Screen Preview
An example of how your screen will look on your display device.Modifications to the Screen Template (see below) will be shown here in real time.
Screen Template
This is where you design the look and content of your screen using standard HTML code, Global, and Field variables.A number of template examples are provided.
Custom CSS Styling
This field allows you to precisely control all the visual elements of your signage screen through the use of CSS (Cascading Style Sheets). This field will accept the URL to an external .css file, or (starting from v1.13 of the Digital Signage addon) raw CSS code directly.Save Changes
Once you're happy with your screen settings and template, click the "Save Changes" button to save your settings.You can edit the template and/or settings for a previously saved screen at any time by simply selecting it in the "Current Screens" list.