What is HTML and how to use it within MIDAS templates?
Templates may be viewed and modified by a user with sufficient privileges via MIDAS Admin Options → Manage MIDAS → Templates.
Here's a complete list of all customizable templates in MIDAS.
Templates are based on standard HTML (Hyper Text Markup Language), inline CSS (Cascading Style Sheet) code - both of which form the basis for every web page on the internet - and additional special variables
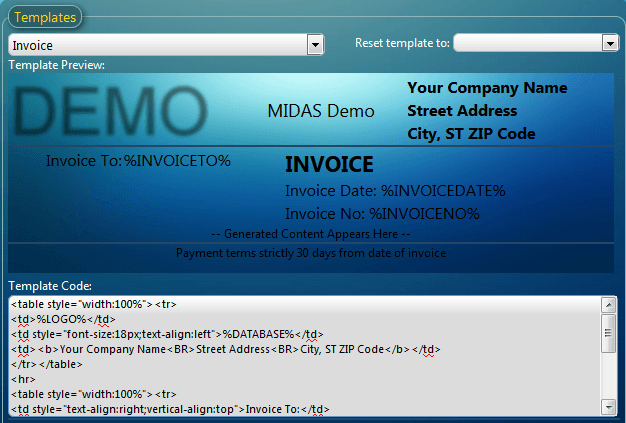
For managing templates, we provide both a raw code editor and a WYSIWYG-style editor:

The "Template Code" area allows direct input of HTML and inline CSS code.
The "Template Preview" area renders a preview of the current Template Code, but this preview itself may also be modified directly by inserting/editing text or moving elements around, etc.
Given the popularity of HTML and CSS, there are a wealth of resources and tutorials available online should you wish to learn more about this simple mark-up language, but if you're brand new to HTML/CSS and find it a little daunting, we'll describe below some common HTML codes and inline styling which you'll find useful when it comes to customizing your templates within MIDAS.
| Description | HTML/CSS Code | Example Result | |||||||||
| Add a link (URL) | <a href="https://mid.as">MIDAS Room Booking Software</a> | MIDAS Room Booking Software | |||||||||
| Make text bold | Here's some <b>bold</b> text | Here's some bold text | |||||||||
| Make text underlined | Here's some <u>underlined</u> text | Here's some underlined text | |||||||||
| Make text italic | Here's some <i>italic</i> text | Here's some italic text | |||||||||
| Make text bold and italic | Here's some <b><i>bold and italic</i></b> text | Here's some bold and italic text | |||||||||
| Add an image | <img src="https://url_ |  | |||||||||
| Start a new line | Line 1<br>Line 2 | Line 1 Line 2 | |||||||||
| Left-align content | <div style="text-align:left">Text to the left</div> | Text to the left | |||||||||
| Center-align content | <div style="text-align:center">Text in the center</div> | Text in the center | |||||||||
| Right-align content | <div style="text-align:right">Text to the right</div> | Text to the right | |||||||||
| Change the color of text | Here is some <span style="color:red">red text</span> | Here is some red text | |||||||||
| Change the size of text | Here is some <span style="font-size:24px">bigger text</span> | Here is some bigger text | |||||||||
| Change the font | Here is some <span style="font-family:'Times New Roman'">Times New Roman text</span> | Here is some Times New Roman text | |||||||||
| Add a table | |
|
The above are examples of basic HTML code and inline styling which will help you get started with customizing the various templates available within MIDAS. To learn more about HTML and CSS, please search for "HTML tutorials" and "CSS tutorials" in your favorite internet search engine.
Please note that invalid code within your MIDAS templates may cause them to display incorrectly, or not at all. But don't worry, if you get into a mess you can reset individual templates to their system default at any time via the "Reset Template" drop-down above the template editor.
← Return to the Knowledge Base