Once the Domain Alias plugin has been installed and activated in your MIDAS system, it may be configured via MIDAS Admin Options → Addons → Domain Alias.
Domain Alias Settings
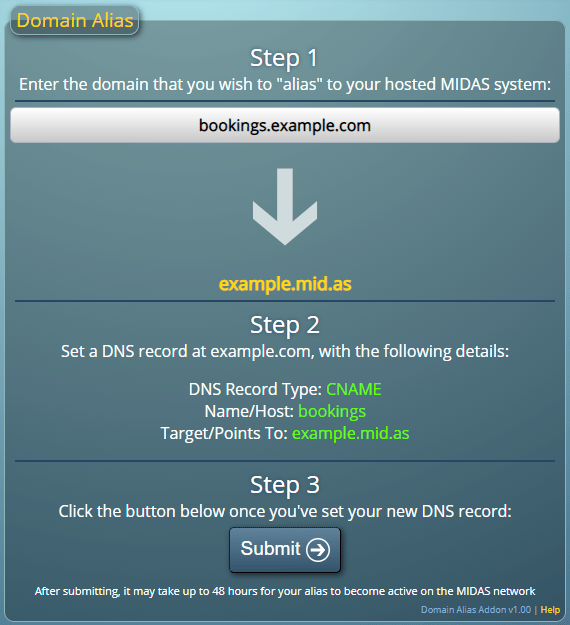
When initially setting up a domain alias, there are three steps:
Step 1
Enter the domain that you wish to "alias" to your hosted MIDAS system. For example, "bookings.example.com". Please note that you must have access to be able to create DNS records on/for the domain specified here.
Step 2
Set a "CNAME" DNS record on/for the domain entered in Step 1. For example, if you entered "bookings.example.com" in the first step, you should create a CNAME DNS record on your "example.com" domain for the name/host "bookings", and set its target to be the domain of your cloud-hosted MIDAS system (for instance "example.mid.as").
IMPORTANT: If there are existing DNS records (i.e. A or AAA records) set for your alias domain (in this example "bookings.example.com") they must be removed, leaving only a CNAME record for "bookings.example.com".
Step 3
Once you've correctly configured your DNS record, click the "Submit" button. This lets us know that you've set up your DNS CNAME record. Once we've confirmed this, we'll then implement this on our MIDAS network.If you wish to change/update your Domain Alias at any time, simply revisit the Domain Alias addon settings page.
This will display the current domain alias along with a "Change" button.
Clicking the "Change" button will allow you to enter new information as per Step 1 above. Once you've entered your new domain alias (and set an associated DNS record), you'll be able to "Submit" your changes.
 MIDAS Domain Alias Configuration
 MIDAS Domain Alias Configuration