Once the Custom Branding plugin has been installed and activated in your MIDAS system, it may be configured via MIDAS Admin Options → Addons → Custom Branding.
Custom Branding Options
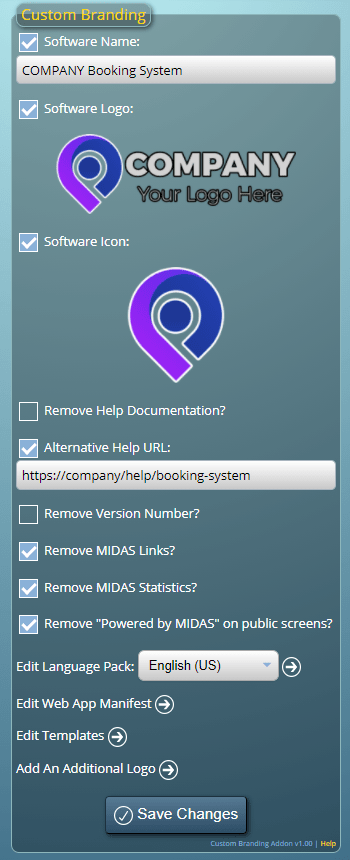
The configuration screen contains the following settings:
Software Name
Specify a name to change instances of "MIDAS" to throughout the software.
Software Logo
Upload a .png image to use as the software logo (replacing the standard "MIDAS" logo). This will appear on the login screen, and may be used within templates. Click on the current logo to upload a new logo.
Software Icon
Upload a .png image to use as the software icon. This will appear on browser notification messages from your MIDAS system. Click on the current icon to upload a new icon.
Remove Help Documentation?
This setting removes "Help" links to the included MIDAS documentation throughout the software. The standard help documentation contains numerous references to MIDAS as well as links to the MIDAS website, so this setting may be used to suppress links to the documentation.
Alternative Help URL
This setting allows specifying a different URL for the "Help" links within the software. This allows you to replace the included MIDAS help documentation with your own documentation.
Remove Version Number?
By default, even if you change the name that appears on the software, the corresponding MIDAS version number remains. For example, if you rename "MIDAS" v4.28 to "MySoftware", it will appear as "MySoftware v4.28". Selecting the "Remove Version Number?" option will suppress visible references to the corresponding MIDAS version number.
Remove MIDAS Links?
By default, when you are approaching the maximum user/venue limits allowed under your MIDAS license, the software provides a link allowing you to upgrade your license. This option suppresses such links. It will also suppress any in-software links (excluding within the help documentation itself) to KB articles on our website.
Remove MIDAS Statistics?
The MIDAS statistics screen in the software (accessed via Statistics → MIDAS) provides information about the current MIDAS version, build date, and changelog. This setting removes the "MIDAS" option on the Statistics screen.
Remove "Powered by MIDAS" on public screens?
Public facing elements of MIDAS (such as online invoice payments, and public booking/request screens) include a small "Powered by MIDAS" link in the lower right corner. This setting removes these links from public screens.
Delete favicon?
Deletes the small icon that may appear in the user's browser address bar and/or bookmark for your MIDAS system.
Edit Language Pack
This option allows you to modify and customize any phrase used within MIDAS. These modifications also persist through subsequent software updates.
To modify a phrase, first select the language pack you'd like to modify.
Next start typing a few letters from the word or phrase you'd like to change.
A drop-down list will show phrases that match the characters you've entered.
Select the phrase you wish to modify from this list, and in the "Change Phrase To" field, enter your new phrase.
Changes to the phrase are automatically saved when the "Change Phrase To" field looses focus.
To reset a phrase to its factory setting, locate the phrase from the drop-down and click the "Reset to default" link.
To remove all modifications to the selected language pack, click the "Reset all modifications" link.
Edit Web App Manifest
This allows editing of the Web App Manifest file ("manifest.json") included with the software. For more information on web app manifests, please see these articles from web.dev and w3.org.
Edit Templates
Provides a direct link to the MIDAS Admin Options → Manage MIDAS → Templates screen, from where various templates (email, print, invoice, etc) may be customized.
Add An Additional Logo
Provides a direct link to MIDAS Admin Options → Manage MIDAS → Appearance, from where a second logo may be uploaded and installed within the software.
Save Changes
Click the "Save Changes" button to save your custom branding settings.
 MIDAS Custom Branding (White-Label) Configuration
 MIDAS Custom Branding (White-Label) Configuration