How to automate heating control with Inspire Smart Thermostats
There are two options for setting up Inspire Smart Thermostats to control heating based on bookings in MIDAS...
The first option is available as standard in every MIDAS system. It involves manually exporting bookings and then uploading this data to your Smart thermostat.
The second option automatically reads data from your MIDAS system every 24 hours, so that any changes to bookings since the last check can be automatically captured and the heating schedule automatically adjusted accordingly. The second option requires our optional Data Feeds add-on.

Here's how the two options work....
Option 1: Export Bookings
Step 1: Export bookings in iCal format from MIDAS
In MIDAS go to MIDAS Admin Options → Export → Bookings. Select the date range of bookings you wish to export, and ensure that the export format is set to "iCal Format". Click "Export" and you'll be prompted to download an .ical file of your bookings.Step 2: Upload bookings into your Inspire Smart Thermostat
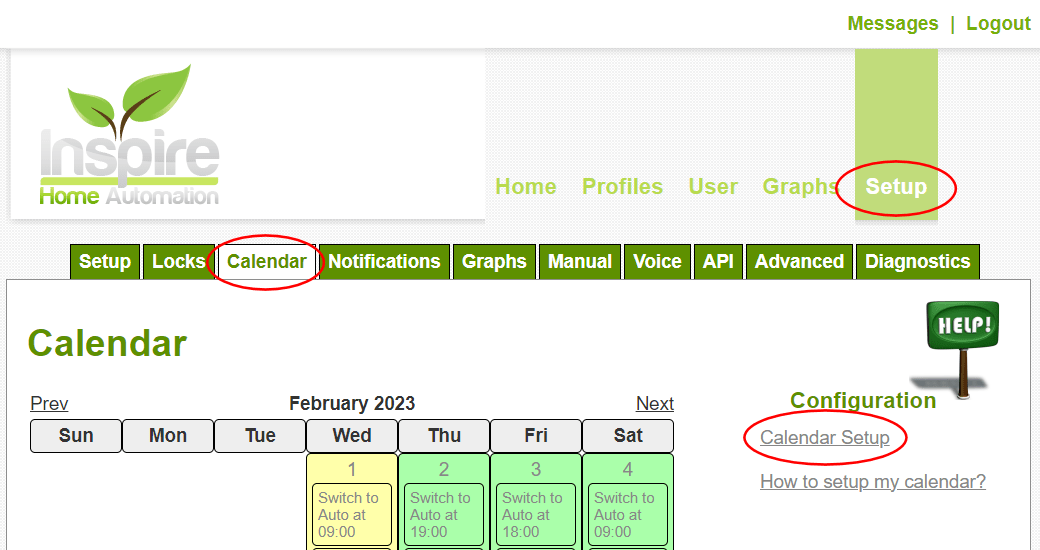
In your Inspire control panel, go to Setup → Calendar → Calendar Setup:
Select the "File" calendar option, click the "Choose File" button, select the .ical file you downloaded in the previous step, and then click the "Reload" button:

Step 3: Configure additional thermostat settings
The "Default Settings" are on the Calendar Setup screen allow you to configure how your thermostat will respond to the calendar events you've uploaded. See the "Additional Configuration" section below for more information.Option 2: Sync Bookings
Step 1: Add the optional Data Feeds add-on to your MIDAS system
Add the Data Feeds addon to your MIDAS system here.Step 2: Create a Data Feed
Create a new iCal data feed.Step 3: Copy the Feed URL into your Inspire Smart Thermostat
Once you've created your data feed, copy the Feed URL. Then, n your Inspire control panel, go to Setup → Calendar → Calendar Setup:
Select the "URL" calendar option, paste in the Feed URL from the previous step, and then click the "Reload" button:

Step 4: Configure additional settings
The "Default Settings" are on the Calendar Setup screen allow you to configure how your thermostat will respond to the calendar events you've uploaded. See the "Additional Configuration" section below for more information.Additional Configuration
The "Default Settings" are on the Calendar Setup screen controls how your thermostat will respond to calendar events.| Setting | Description |
|---|---|
| Check In | This is start time of your booking. |
| Check Out | This is end time of your booking. |
| Function | This is the function that the thermostat will change to. |
| Time | If the calendar doesn't include a start or end time, then you will need to specify one. |
| Override | If you want to ignore the time within the calendar and use the time specified in the setup page, then check this box. |
| Offset | This is the time before the check in, or check out, that you would like the thermostat to activate. |
| Negative | This will give you a negative offset. With this ticked, the offset will be the time AFTER the check in, or check out. |
Example
Your calendar has an event at 10:00 on Monday until 17:00 on Friday.
For Check In, the time is used from the calendar. The offset will be applied to this meaning that at 8:00 on Monday the thermostat will switch to Auto.
For Check Out, the override is flagged, so the time used will be 16:00 rather than 17:00. The offset will still be applied to this, meaning that at 13:00 the thermostat will switch to off.
Advanced Configuration
There may be times when you need different temperatures for events. For instance, a hall booked for a Spin class would require a different temperature to one booked for Bingo.To handle this, you can add any (or all) of the following into the "Booking Notes" field in MIDAS for the booking:
- InspireFunction='Man'
- InspireTemperature='22.5'
- InspireProfile='2'
- InspireEndFunction='Auto'
- InspireEndTemperature='15'
- InspireEndProfile='3'
This would override the default check in (or out) function, and allow the temperature to be changed.
When the event starts, the above settings would switch the function to 'Man', activate Profile 2 and put the set point to 22.5 degrees. At the end of the event, the Thermostat would be set to 'Auto', profile 3 activated and the temperature lowered to 15 degrees.
The available functions are:
- Off
- Auto
- Man
- Boost
More Information
For more information on Smart Thermostats products, please visit the Inspire Home Automation website.← Return to the Knowledge Base